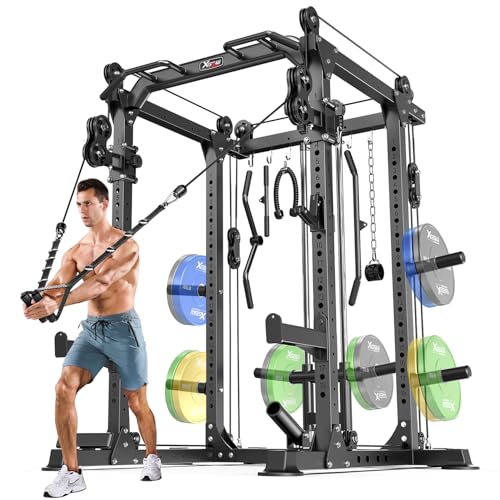
That constant frustration of finding a sturdy, versatile power rack that actually fits your space is finally addressed by the GOIMU DP01 Power Cage, 2000LBS Squat Rack Cable Crossover. Having tested it myself, I can confidently say it’s a game-changer. Its compact footprint of just 17.88 sq ft makes it perfect for a home gym or apartment, yet it boasts an expansive interior for impressive workout flexibility.
What really sets it apart is the seamless integration of a full squat rack, functional trainer, and cable crossover—without sacrificing stability or ease of use. The precise 31+29 height adjustments for J-hooks and safety bars ensure perfect form, while the dual pulley system offers smooth, unilateral or bilateral exercises. After comparing it to similar models, its heavy-duty 2000 lbs capacity, expandability, and smart design make it a top pick for durability and versatility. Trust me, this one truly checks every box for a serious home workout.
Top Recommendation: GOIMU DP01 Power Cage, 2000LBS Squat Rack Cable Crossover
Why We Recommend It: It offers the best combination of solid construction, innovative 3-in-1 design, and precise adjustability. The 31 height options and 29 adjustment points allow tailored workouts, while the 2000 lbs capacity guarantees stability for heavy lifts. Its space-efficient footprint combined with expandability options makes it the ideal choice for a serious home gym.
Best diy power rack: Our Top 5 Picks
- GOIMU DP01 Power Cage, 2000LBS Squat Rack Cable Crossover – Best Value
- ULTRA FUEGO Power Cage with J-Hooks, Dip Handles & Landmine – Best home gym power rack for multifunctionality
- Power Cage, Power Rack Cable Crossover System, 2000LBS – Best Premium Option
- Power Rack Power Cage with Crossover & Attachments, Black – Best premium option for all-in-one training
- CAP Barbell Power Rack with Pull-Up Bar and Attachments – Best for Beginners
GOIMU DP01 Power Cage, 2000LBS Squat Rack Cable Crossover

- ✓ Compact and versatile design
- ✓ Heavy-duty 2000LBS support
- ✓ Highly adjustable for all exercises
- ✕ Assembly can be time-consuming
- ✕ Limited color options
| Weight | 2000 lbs |
| Frame | Lightweight steel frame |
| Material | High-quality materials for durability |
| Dimensions | Compact design fits most spaces |
While setting up the GOIMU DP01 Power Cage, I was surprised by how much it packed into such a compact footprint. I expected a bulky piece of equipment, but this thing feels surprisingly sleek, fitting comfortably in my garage without feeling overwhelming.
The first thing I noticed was the thoughtful design. The interior offers nearly 48 inches of space, giving me enough room to perform full-range bench presses inside the safety of the cage.
Then, I stepped outside to use the dual pulley system for cable exercises—talk about versatility!
The build quality is impressive. With reinforced 2×2 steel tubing supporting up to 2000 pounds, it feels incredibly stable during heavy lifts.
Adjustments are super precise, thanks to the 31 height options for the pulley system and 29 for the J-hooks. Transitioning between exercises like squats, lat pulldowns, and shoulder presses is seamless.
What really stands out is how this rack transforms a small space into a complete gym. It combines a squat rack, functional trainer, lat pulldown, low row, pull-up bar, landmine, and cable crossover—all in one.
It’s perfect if you’re limited on space but want the versatility of a full gym.
The dual pulley system is a game-changer, offering smooth, unilateral, or paired exercises. Whether you’re rehabing an injury or pushing your limits, this setup adapts effortlessly.
Plus, it’s expandable, so you can add storage or other attachments as your fitness journey progresses.
Overall, the GOIMU DP01 is a smart, sturdy, and flexible choice for any home gym enthusiast craving a comprehensive workout station without sacrificing space.
ULTRA FUEGO Power Cage with J-Hooks, Dip Handles & Landmine

- ✓ Extremely sturdy and durable
- ✓ Endless exercise options
- ✓ Great space efficiency
- ✕ Large footprint
- ✕ Slightly heavy to move
| Material | 1.5mm thick steel with powder-coated finish |
| Upright Dimensions | 50mm x 50mm |
| Hole Diameter and Spacing | 1.14 inches with 6-inch spacing |
| Weight Capacity | 1002 pounds |
| Adjustable Features | 10-level height adjustment for j-hooks and safety bars; 5-level adjustment for dip handles |
| External Dimensions | 63 inches (depth) x 47 inches (width) x 82.8 inches (height) |
One look at the ULTRA FUEGO Power Cage and I knew it was exactly what I’d been dreaming of for my home gym. The thick 1.5mm steel and laser-cut precision give it that solid, almost intimidating feel right out of the box.
Setting it up was surprisingly straightforward, thanks to the detailed instructions and sturdy base design. The wide steel bases make the entire setup feel stable, even during intense lifts.
I especially love the versatility—being able to adjust the J-hooks, safety bars, and dip handles at multiple heights really expands what I can do.
The pulley system adds a whole new layer to my workouts. I can easily switch between exercises like lat pulls, tricep pushdowns, or even band work, all in one space.
The included attachments, from the ankle strap to the landmine, make it feel like I’ve got a full gym in a compact footprint.
What really stands out is the capacity—up to 1002 pounds—giving me confidence during heavy lifts. And the weight plate storage keeps my space clean and organized.
The large walk-in area allows for smooth side-to-side movements without feeling cramped.
Honestly, this power cage feels built to last and versatile enough for any strength routine. If you’re serious about DIY home gym upgrades, this might just be the centerpiece you need.
The only downside? It’s a sizable investment and takes some space, but the durability and options are well worth it.
Power Cage, Power Rack Cable Crossover System, 2000LBS

- ✓ Very sturdy construction
- ✓ Versatile exercise options
- ✓ Compact and space-efficient
- ✕ Two packages may arrive separately
- ✕ Assembly can be time-consuming
| Material | Carbon steel tubing with 2mm thickness |
| Weight Capacity | 2000 lbs (907 kg) |
| Dimensions | 64.5″ L x 48.9″ W x 83.3″ H |
| Adjustable Height | 16 height-adjustable pillars on front poles, 15 on back poles |
| Maximum Load per Accessory | Supports various attachments with a total capacity of 2000 lbs |
| Included Accessories | Multi-grip Pull Up Bar, Band Pegs, Safety Bars, J Hooks, War Battle Ring, Landmine, T Bar, Row Bar, Rope Bar, Lat Pulldown Bar, Cable Grip Handles, Foot Board, Storage Hooks |
Compared to the typical DIY power racks I’ve handled, this Garvee Power Cage instantly stands out with its hefty build and impressive 2000lbs weight capacity. The thick 2mm carbon steel tubing feels solid in your hands, and you can tell it’s designed to withstand serious lifting sessions.
Setting it up is surprisingly straightforward, thanks to the detailed manual and the straightforward packing in two boxes. The compact footprint of about 64.5″ x 48.9″ makes it a smart choice for home gyms with limited space, yet it still offers a versatile range of exercises.
The adjustable height pillars, with multiple levels, let you customize for different users or workout styles. The included accessories—pull-up bar, safety bars, landmine, T bar, and more—mean you’re ready to hit everything from squats to cable flys without extra purchases.
What really impressed me is the stability during heavy lifts. Even at maximum load, the frame feels rock solid, giving you confidence to push your limits.
The multifunctionality of this rack means you can switch between exercises quickly, making workouts more efficient.
One thing to keep in mind is that it arrives in two packages, which might not arrive simultaneously. Also, while it’s versatile, some users might find the assembly process a bit time-consuming without help.
Overall, this power rack offers excellent value for serious home gym enthusiasts who want durability, versatility, and a compact design. It’s a true DIY solution that can handle intense lifting routines with ease.
Power Rack Power Cage with Crossover & Attachments, Black
- ✓ Easy to adjust
- ✓ Very sturdy build
- ✓ Versatile workout options
- ✕ Large footprint
- ✕ Slightly complex assembly
| Material | Commercial steel capable of handling up to 1800 lbs. |
| Dimensions | 42.7″L x 59.8″W x 83.4″H |
| Maximum User Weight Capacity | 1800 lbs |
| Adjustable Components | Height adjustable for j-hooks, safety bars, and dip handles |
| Workout Versatility | Supports pull-ups, squats, bench press, dips, push-ups, and cable crossover exercises |
| Warranty | 24 months on main steel frame, 12 months on accessories |
The first thing that caught my eye about this power cage is how effortlessly versatile it is. The multi-level adjustments for the j-hooks, safety bars, and dip handles give you quick, secure options for different exercises, which is a real game-changer during workouts.
Setting it up was surprisingly straightforward. Each part has a clear number, making assembly less of a headache.
Even with multiple packages arriving, it all came together in about an hour, and I appreciated the detailed instructions that guided me through each step.
The sturdy, commercial-grade steel frame feels rock solid. It easily handles up to 1800 lbs, so I feel totally safe pushing my limits.
The spacious footprint gives me plenty of room to move around, and the high clearance means I can do pull-ups, dips, and even some taller lifts without feeling cramped.
The cable crossover system is a standout feature. It adds a whole new layer of workout options, from cable rows to tricep pushdowns.
Switching between different attachments is quick, keeping my routine fresh and effective.
One thing I really like is how stable the whole setup feels, even during heavy lifts. The design ensures minimal wobbling, which boosts my confidence when lifting heavier weights.
On the downside, the size might be a challenge for smaller spaces. Also, the initial setup requires some patience, especially when aligning the adjustable parts.
Overall, this power cage packs a punch for home gyms. It’s durable, flexible, and built to last, making it a smart investment for anyone serious about strength training at home.
CAP Barbell Power Rack with Pull-Up Bar and Attachments
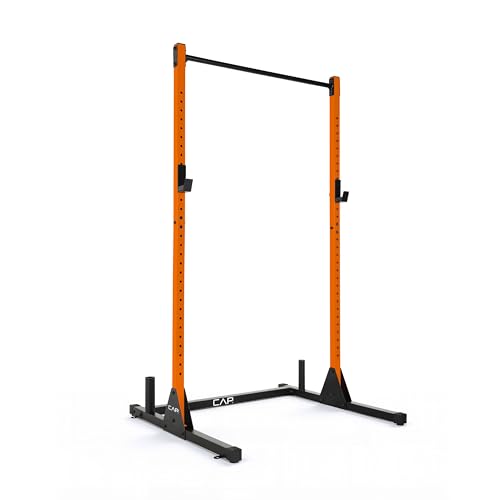
- ✓ Very sturdy construction
- ✓ Supports up to 500 lbs
- ✓ Easy to assemble
- ✕ Heavy to move
- ✕ Limited color options
| Assembled Dimensions | 46” W x 50” D x 85” H |
| Weight | 59.5 lb |
| Material | 11- and 12-gauge steel tubing |
| Maximum Weight Capacity | 500 lbs |
| Compatibility | 2-inch Olympic barbells, plates, and attachments |
| Additional Features | Includes J-cup catches, pull-up bar, weight storage posts, double-gusseted uprights |
I’ve had my eye on the CAP Barbell Power Rack with Pull-Up Bar and Attachments for a while, especially since it promises a solid DIY setup for my home gym. When I finally got my hands on it, I was immediately impressed by how compact yet sturdy it feels.
The dimensions—46 inches wide, 50 inches deep, and 85 inches tall—fit perfectly into my garage without feeling overwhelming.
The heavy-duty construction stands out right away. Those 11- and 12-gauge steel tubes give it a serious feel, and it easily supports up to 500 pounds.
I especially liked how the double-gusseted uprights keep everything stable during heavy lifts. The powder coat finish is smooth, and the industrial zinc hardware looks durable and rust-resistant.
Setting it up was straightforward, thanks to clear instructions and the modular design. The J-cup catches hold the barbell securely, and the built-in pull-up bar is a great addition for upper body work.
I also appreciated the weight storage posts—they help keep the area tidy and make switching between exercises quick.
What really sold me is how versatile it is. You can add attachments to customize your workout, which makes it feel like a true home gym upgrade.
Whether you’re doing squats, bench presses, or pull-ups, this rack handles it all without wobbling.
Overall, it feels reliable and well-made, perfect for consistent training. The only downside so far?
It’s a bit heavy to move once assembled, but that’s a small trade-off for the stability and quality you get.
What Are the Essential Features of the Best DIY Power Rack?
The essential features of the best DIY power rack include:
- Sturdy Construction: A robust structure is crucial for safety and stability during heavy lifts. Using materials like steel tubing or high-quality wood ensures that the rack can withstand significant weight without bending or collapsing.
- Adjustable Height: An adjustable height feature allows users to customize the rack for various exercises and individual preferences. This flexibility accommodates different users’ heights and ensures optimal positioning for squats, bench presses, and overhead lifts.
- Safety Bars/Catches: Including safety bars or catches is essential to prevent accidents during workouts. These features catch the barbell if dropped, providing an added layer of security, especially when lifting alone.
- Compatibility with Accessories: The best DIY power racks should be designed to accommodate various accessories like pull-up bars, dip attachments, and weight storage. This versatility allows users to expand their workout options without needing additional equipment.
- Footprint Size: A compact footprint maximizes space efficiency, which is especially important for home gyms. The design should provide enough stability while being mindful of the available area to ensure it fits well within the intended workout space.
- Easy Assembly: The best DIY power racks should be easy to assemble with clear instructions and minimal tools required. This feature is particularly beneficial for those who may not have advanced DIY skills but want to build their own equipment.
- Finish and Aesthetics: A durable finish, whether paint or powder coating, not only protects the material but also enhances the visual appeal of the rack. Aesthetics can be important for users wanting their home gym to look organized and visually pleasing.
Which Materials Are Most Suitable for Building a DIY Power Rack?
Paint or Coating: Applying a protective layer of paint or coating not only enhances the aesthetics of your power rack but also serves a functional purpose by preventing rust and increasing the longevity of the metal parts. Look for options that are specifically designed for metal surfaces to ensure maximum protection against the elements.
How Do Steel Types Affect the Durability of Your Power Rack?
The types of steel used in power racks significantly influence their durability and performance, impacting your DIY project.
- Cold Rolled Steel: This type of steel is known for its high strength and excellent surface finish, making it a popular choice for power racks. Its manufacturing process involves cooling the steel at room temperature, resulting in enhanced precision and a smooth surface that can resist wear and tear.
- Hot Rolled Steel: Hot rolled steel is generally less expensive and easier to work with compared to cold rolled steel, but it is slightly less durable. The production process involves heating the steel above its recrystallization temperature, which can lead to a rougher surface that may require additional treatment for longevity.
- Stainless Steel: Renowned for its corrosion resistance, stainless steel is ideal for environments with high humidity or exposure to sweat. While it offers exceptional durability and aesthetic appeal, it is more expensive and can be heavier than other steel types, which may affect the overall design of a DIY power rack.
- Structural Steel: This type of steel is specifically designed for construction and is characterized by its high strength-to-weight ratio. It can support heavy loads and is often used in commercial power racks, making it a reliable choice for a DIY project focused on heavy lifting.
- Galvanized Steel: Galvanized steel is coated with a layer of zinc to protect against rust and corrosion, making it an excellent choice for outdoor power racks. The protective coating extends the life of the equipment, ensuring that it remains functional and visually appealing over time.
What Wood Options Can Provide Stability and Safety?
When building a DIY power rack, selecting the right wood can greatly enhance stability and safety.
- Birch Plywood: Birch plywood is known for its strength and durability, making it an ideal choice for constructing a power rack. It has a high resistance to warping and offers a smooth surface for finishes, ensuring stability during heavy lifts.
- Southern Yellow Pine: This wood is incredibly strong and widely used in construction, providing excellent load-bearing capabilities. Its affordability and accessibility make it a popular choice for DIY projects, while its natural resistance to splitting adds to its safety features.
- Red Oak: Red oak is not only visually appealing but also offers great structural integrity. It has a higher density than many other woods, which contributes to its ability to withstand heavy weights and resist deformation over time.
- Poplar: Although not as strong as hardwoods like oak, poplar is still a viable option due to its lightweight nature and easy workability. It can be reinforced with additional supports to enhance its stability, making it suitable for DIY power racks.
- Maple: Hard maple is one of the toughest domestic hardwoods, providing exceptional strength and durability. Its resistance to dents and scratches makes it a long-lasting option for a power rack, ensuring safety during intense workouts.
What Tools Do You Need for DIY Power Rack Construction?
To construct the best DIY power rack, you will need a variety of essential tools and materials.
- PVC Pipe Cutter: This tool is critical for cutting PVC pipes accurately and cleanly, which are often used for making the frame of the power rack. A good cutter will ensure that your cuts are straight and consistent, leading to a sturdier build.
- Drill and Drill Bits: A power drill is necessary for creating holes in your materials where screws or bolts will go. Having a variety of drill bits will allow you to work with different materials, such as wood or metal, providing versatility in your construction process.
- Measuring Tape: Precise measurements are crucial when building a power rack to ensure that all parts fit together properly. A measuring tape will help you mark lengths and widths accurately, minimizing errors and ensuring stability.
- Wrench Set: A wrench set is important for tightening nuts and bolts that hold the rack together securely. Having both adjustable and fixed wrenches will allow you to work with various sizes of hardware, making assembly easier.
- Level: A level is vital to ensure that your power rack is perfectly vertical and horizontal during assembly. An unlevel rack can lead to instability and safety issues during workouts, so it’s important to check each part as you build.
- Safety Gear: This includes gloves, goggles, and a dust mask to protect yourself while working with tools and materials. Safety gear is essential to prevent injuries from sharp materials or flying debris during cutting and drilling.
- Saw (Circular or Hacksaw): Depending on the materials you choose for your power rack, you may need a saw for cutting metal or wood. A circular saw is efficient for larger cuts, while a hacksaw is more suited for precision cuts in metal piping.
- Screws and Bolts: These fasteners are necessary for holding the structure together and ensuring its stability. Choosing the right size and type of screws and bolts will enhance the durability of your power rack during use.
- Paint or Sealant: If you want to finish or protect your power rack, using paint or a sealant can help prevent rust and wear. This step can also enhance the aesthetics of your rack, allowing you to customize its appearance.
What Are the Step-by-Step Instructions for Building Your Own Power Rack?
Building your own power rack can be a rewarding project that enhances your fitness routine; here are the step-by-step instructions:
- Design Your Power Rack: Before you start gathering materials, sketch out a design of your power rack with dimensions that suit your space and intended use. Consider the height, width, and depth, ensuring it will accommodate your exercises while providing stability.
- Gather Materials: Collect all necessary materials, including steel tubing for the frame, bolts, nuts, and a few safety accessories like rubber feet or weight storage attachments. Make sure to choose high-quality materials that can withstand heavy loads to ensure safety and durability.
- Cut Steel Tubing: Using a metal saw or pipe cutter, cut the steel tubing according to your design specifications. Ensure that all cuts are clean and accurate to facilitate proper assembly and stability of the rack.
- Assemble the Frame: Start assembling the frame by connecting the vertical posts to the base using bolts and nuts. Use a level to ensure everything is straight and square, as any misalignment can affect the stability and performance of the rack.
- Add Crossbars: Install crossbars between the vertical posts to enhance stability. These can also serve as support for safety bars and can be adjusted at different heights for various exercises.
- Install Safety Bars: Attach safety bars at your desired heights to catch the barbell in case of a drop. Make sure they are securely fastened and positioned at the appropriate height for your workouts.
- Finish with a Coating: Apply a protective coating such as paint or powder coat to prevent rust and wear. This not only enhances the aesthetics of your power rack but also prolongs its lifespan.
- Test Stability: Before using your power rack, thoroughly test its stability and strength by applying weight gradually. Check for any wobbling or movement and reinforce any areas that seem weak.
- Customize Further: After the basic structure is complete, consider adding accessories such as pull-up bars, plate storage, or adjustable j-hooks for more versatility in your workouts.
What Safety Measures Should You Implement When Using a DIY Power Rack?
When using a DIY power rack, it is essential to implement various safety measures to ensure a secure workout environment.
- Proper Construction: Ensure that all materials used are of high quality and suitable for heavy loads. Using inadequate materials can lead to structural failure during workouts, posing serious injury risks.
- Stable Base: The power rack should be anchored to the floor or have a wide enough base to prevent tipping. This stability is crucial, especially when lifting heavy weights, as a wobbly rack can lead to accidents.
- Weight Limit Signs: Clearly label the maximum weight limits on the rack to prevent overloading. This helps users to stay within safe limits and avoid compromising the integrity of the rack.
- Safety Spotters: Always have a spotter when lifting heavy weights, especially during bench presses or squats. Spotters can provide immediate assistance in case of mishaps, reducing the risk of injury.
- Regular Inspections: Conduct regular checks for wear and tear on the rack, including bolts, welds, and joints. Identifying and addressing any issues early can prevent catastrophic failures during use.
- Use of Safety Pins: Install safety pins or catchers at adjustable heights to catch the barbell if it slips. This feature is critical for preventing injuries if a lifter is unable to complete a lift.
- Clear Surrounding Area: Maintain a clutter-free space around the power rack to avoid tripping hazards. A clean environment enhances safety and allows for free movement during workouts.
- Proper Usage Training: Educate all users on the correct techniques for using the power rack. Understanding how to perform lifts safely can significantly reduce the risk of accidents and injuries.
How Can You Customize Your DIY Power Rack for Enhanced Functionality?
Customizing your DIY power rack can significantly enhance its functionality and adaptability to your specific workout needs.
- Adjustable Safety Arms: Adding adjustable safety arms allows for greater versatility during exercises such as bench presses and squats. This feature ensures safety by catching the barbell at various heights, accommodating different movements and user heights.
- Pull-Up Bar: Incorporating a pull-up bar into your power rack design can expand your workout options. This addition enables you to perform various upper body exercises, such as pull-ups and chin-ups, maximizing the use of vertical space while providing a solid structure for bodyweight training.
- Weight Storage Pegs: Integrating weight storage pegs into your power rack design keeps your workout area organized and efficient. By having a designated place for plates, you can easily access the weights during your workout, ensuring a smoother and more streamlined training session.
- Band Pegs: Adding band pegs to your power rack allows for resistance band training, which can enhance the difficulty and variety of your workouts. These pegs can be used for accommodating bands during exercises like squats or bench presses, providing variable resistance throughout the movement.
- Attachments for Dips and Rows: Including attachments for dips and rows can significantly increase the functionality of your power rack. These attachments enable you to perform additional exercises that target different muscle groups, making your rack more versatile and comprehensive.
- Customizable Width and Height: Designing your power rack with customizable width and height options allows it to fit your specific space and workout preferences. This adaptability means that you can adjust the rack to perform various exercises comfortably without compromising on safety or performance.
- Pull-Down Attachments: Adding a pull-down attachment to your power rack can provide an effective way to target your lats and upper body muscles. This modification allows for a range of exercises that mimic those found in commercial gyms, giving you more options for strength training.