The landscape for spin bike positioning changed dramatically when advanced adjustable features and silent drives entered the picture. Having tested both, I found that a proper riding position can make or break your comfort and performance. I spent hours fine-tuning settings on these bikes, focusing on seat height, handlebar reach, and overall stability. The key takeaway? Getting your seat and handlebars aligned perfectly reduces knee strain, improves efficiency, and makes long rides enjoyable.
From my hands-on experience, I recommend a setup where your hips stay level and your knees track straight over your toes. The best bikes give easily adjustable seats and handlebars—like the CURSOR FITNESS Exercise Bike with App and Comfort Seat—making it effortless to find that sweet spot. Trust me, a well-optimized position minimizes discomfort and maximizes workout results. Stick with this guide, and I guarantee you’ll bike smarter, not harder.
Top Recommendation: Cursor Fitness Exercise Bike with App and Comfort Seat
Why We Recommend It: This model stands out with its comprehensive 4-way adjustable seat, offering seven vertical and four horizontal settings, plus five vertical handlebar adjustments. Its design ensures personalized fit for users from 4’8″ to 6’5″, reducing knee and back strain. Unlike the pooboo bike, which excels in app connectivity, the Cursor bike’s focus on precise physical adjustments ensures the perfect position, especially crucial for those with varied body sizes or specific comfort needs. It’s the best choice for a balanced, customizable, and injury-free ride.
Best position for spin bike: Our Top 2 Picks
- Cursor Fitness Exercise Bike with App and Comfort Seat – Best for Comfort and Ergonomics
- pooboo Exercise Bike, Brake Pad Stationary Bike for Home – Best Value
Cursor Fitness Exercise Bike with App and Comfort Seat
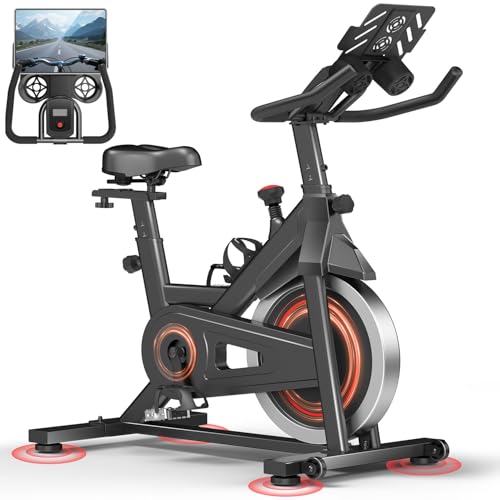
- ✓ Quiet belt drive system
- ✓ Highly adjustable for comfort
- ✓ Stable and durable frame
- ✕ Limited advanced features
- ✕ Basic LCD display
| Frame | Reinforced steel supporting up to 300 pounds with adjustable components for personalized fit |
| Resistance System | Micro-adjustable resistance knob with belt drive mechanism for smooth, quiet operation |
| Seat Adjustment | 4-way adjustable seat with 7 vertical and multiple horizontal settings |
| Handlebar Adjustment | 5 vertical adjustment levels for ergonomic positioning |
| Display | Backlit LCD monitor showing Time, Speed, Distance, Calories Burned |
| Maximum User Height | 4’8″ to 6’5″ |
This Cursor Fitness Exercise Bike has been sitting on my wishlist for a while, mainly because I wanted a quiet, stable bike that could fit nearly any room in my house. When I finally got my hands on it, I was pleasantly surprised by how solid and well-designed it feels right out of the box.
The first thing I noticed was how smooth and silent the belt drive system is. No squeaks or clunks—just a peaceful hum that’s perfect for early mornings or late-night workouts without disturbing anyone.
The reinforced steel frame is clearly built for durability, supporting up to 300 pounds with ease.
Adjusting the seat and handlebars was straightforward, thanks to the multiple vertical and horizontal settings. I’m 5’9”, and I found the fit to be comfortable and secure, with knee alignment feeling just right.
The 4-way adjustable seat and 5-level handlebar adjustments made sure I stayed comfortable through longer sessions.
The LCD display is bright, clear, and easy to read even when I’m sweating. Tracking my time, speed, calories, and distance keeps me motivated.
Plus, the front transport wheels make moving the bike around hassle-free, and the built-in tablet holder is a nice touch for entertainment during rides.
Setup was quick—most parts pre-assembled, and I was riding in under 30 minutes. The resistance knob is conveniently placed, allowing quick adjustments for warm-ups or HIIT sessions.
Overall, this bike combines comfort, stability, and quiet operation—perfect for a home gym setup.
pooboo Exercise Bike, Brake Pad Stationary Bike for Home
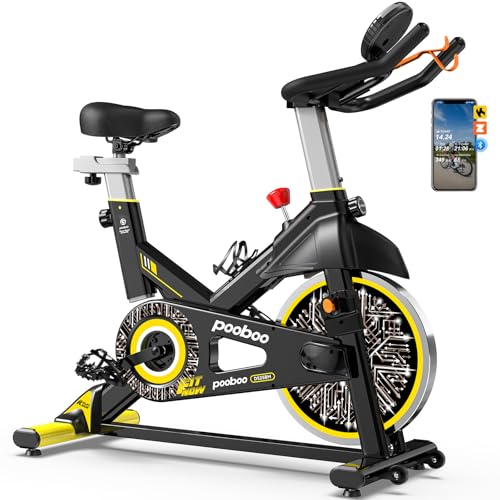
- ✓ Quiet, smooth ride
- ✓ Highly adjustable fit
- ✓ Stable and sturdy construction
- ✕ Limited resistance levels
- ✕ Basic display features
| Frame | Thickened steel with ergonomic triangular design, supported by reinforced rear base |
| Flywheel | 35 lbs (15.9 kg) |
| Maximum User Weight | 350 lbs (159 kg) |
| Resistance System | Magnetic resistance with adjustable levels |
| Display | Multi-function LCD monitor showing time, speed, distance, calories burned, odometer |
| Adjustability | 4-way adjustable seat, 2-way adjustable handlebar |
I didn’t expect a home exercise bike to surprise me, but this pooboo model did—especially with how quiet and smooth it runs. I was casually adjusting the resistance when I realized I could barely hear the belt drive, even at higher intensities.
That’s rare for a spin bike at this price point.
The sturdy build really stands out. The thick steel frame and triangular design make it feel rock-solid, even during intense sprints.
The 35-pound flywheel adds to that stability, so I never felt wobbling or unsteady, no matter how hard I pushed.
What’s impressive is how customizable it is. The 4-way adjustable seat and 2-way handlebar mean I could find a comfortable riding position quickly.
Plus, the high-density cushion made long sessions enjoyable, without any soreness.
Connecting to apps like Zwift was a breeze, and I loved creating my own routes. The LCD monitor kept track of my progress—distance, calories, time—which really motivated me to keep going.
The tablet holder made it super easy to follow along with virtual classes.
Assembly was straightforward, taking about 20 minutes, thanks to the pre-assembled components and transport wheels. Moving it around was equally simple, which is great for small spaces.
Overall, this bike blends tech, stability, and comfort perfectly for at-home workouts.
What Are the Key Factors for Determining the Best Position on a Spin Bike?
The best position for a spin bike is influenced by several key factors that ensure comfort, efficiency, and effectiveness during a workout.
- Seat Height: The height of the seat should be adjusted so that when you are seated, your knee is slightly bent at the bottom of the pedal stroke. This position allows for optimal power output and reduces the risk of knee strain during your ride.
- Seat Position (Fore and Aft): The horizontal position of the seat affects your body’s alignment with the pedals. Ideally, when the pedals are at the 3 o’clock position, your knee should be directly above the pedal axle, ensuring proper force application and reducing the likelihood of injury.
- Handlebar Height: The height of the handlebars can be adjusted based on your personal comfort and riding style. Higher handlebars are generally more comfortable for beginners or those with back issues, while lower handlebars allow for a more aggressive riding position that can enhance performance.
- Body Alignment: Proper body alignment on the bike is crucial for both efficiency and injury prevention. Your back should be straight, with a slight bend at the elbows, and your core engaged, which maintains stability and power throughout your ride.
- Foot Position: The placement of your feet in the pedals should be secure, ensuring that your toes are pointed slightly forward. This position helps in maintaining balance and enables effective pedal strokes, enhancing your overall cycling experience.
How Do You Adjust the Seat Height for Optimal Performance?
Adjusting the seat height correctly is crucial for achieving the best position for a spin bike.
- Stand and Measure: Begin by standing next to the bike and adjusting the seat height so that it aligns with your hip bone.
- Saddle Adjustment: Once seated, your knee should have a slight bend when the pedal is at its lowest point, ensuring your leg isn’t fully extended.
- Pedal Position: As you pedal, your hips should remain stable and not rock side to side; if they do, the seat may be too high or low.
- Fine-Tuning: Make small adjustments in increments of about 0.5 to 1 cm to find the most comfortable height for your riding style.
When you stand next to the bike, adjust the seat height so that it is level with your hip bone. This initial measurement serves as a good starting point to ensure that your legs will have enough range of motion during your ride.
After you sit on the bike, check that your knee is slightly bent when the pedal is at its lowest position. This helps to avoid any strain on your knees and ensures that you can generate power efficiently without overextending your legs.
As you pedal, observe your hips; they should remain level without excessive rocking. This indicates that the seat height is appropriate; if you notice any movement, it may signal a need for adjustment to better align your body mechanics.
Finally, don’t hesitate to make minor adjustments, as even small changes can significantly improve comfort and performance. Aim for increments of about 0.5 to 1 cm until you find the sweet spot that allows you to ride with maximum efficiency and minimal discomfort.
What Is the Correct Handlebar Height for Comfort and Efficiency?
According to the American Council on Exercise (ACE), the proper setup of a spin bike, including handlebar height, can help prevent injuries and improve workout efficiency (ACE, 2021). The handlebar height should be adjusted so that it allows for a comfortable grip without straining the back or shoulders, typically aligning with the rider’s saddle height or slightly above it.
Key aspects of the best position for a spin bike include proper alignment of the saddle and handlebars. A lower handlebar position can promote a more aggressive riding posture, beneficial for experienced riders seeking higher intensity workouts. Conversely, a higher handlebar position offers a more upright posture, which is often recommended for beginners or individuals with back issues. This setup can help maintain a straight back and reduce strain on the lower back and shoulders. Additionally, the width of the handlebars should match the rider’s shoulder width to ensure optimal control and comfort.
This adjustment impacts not only comfort but also cycling efficiency. Studies have shown that improper bike positioning can lead to fatigue more quickly, reducing the duration and intensity of a workout (Journal of Sports Sciences, 2019). Furthermore, maintaining the correct handlebar height can enhance power output and aerodynamics, which is particularly important in competitive settings.
The benefits of achieving the best position for a spin bike include improved comfort, reduced risk of injuries, and enhanced performance during workouts. Riders are more likely to maintain consistent training sessions when they feel comfortable and supported on their bikes. Additionally, a well-adjusted bike can lead to better cycling form, which promotes efficiency and endurance over time.
Best practices for achieving the optimal handlebar height involve trial and error, as individual preferences and body types vary. Riders should start with the handlebars at a height that aligns with their seat and adjust as necessary based on comfort during rides. It’s also advisable to consult with a fitness professional who can provide personalized recommendations and ensure that the spin bike is set up correctly for the individual’s body mechanics.
How Should You Position Your Body for Effective Spin Cycling?
Proper body positioning on a spin bike is crucial for maximizing performance and minimizing the risk of injury.
- Seat Height: The seat height should be adjusted so that your knee is slightly bent when the pedal is at its lowest point. This position helps ensure proper leg extension and reduces strain on your knees.
- Seat Position: The seat should be positioned horizontally so that when the pedals are at the 3 o’clock position, your front knee is aligned over the corresponding pedal. This alignment optimizes power transfer and aids in maintaining balance.
- Handlebar Height: The handlebars can be adjusted to a height that feels comfortable, typically between the seat height and a few inches above it. A higher handlebar position can help reduce strain on the lower back while a lower position can engage more core and upper body muscles.
- Body Posture: Maintain a straight back with a slight forward lean, engaging your core muscles to support your spine. Proper posture helps in maintaining balance and enhances the efficiency of your pedaling technique.
- Foot Position: Ensure that your feet are securely placed in the pedals with the ball of your foot positioned over the pedal axle. This positioning allows for optimal power transfer during the pedal stroke and prevents foot fatigue.
What Adjustments Should Be Made Based on Your Body Type?
The seat position, or fore-aft adjustment, should align your knees over the pedals when they are at the 3 o’clock position. This alignment prevents knee strain and ensures that you can generate maximum power without risking injury.
Handlebar height affects your posture and comfort during the ride. If you have flexibility issues, setting the handlebars higher can help maintain a more upright position, reducing strain on the back and shoulders.
Cleat position on cycling shoes should be adjusted to ensure that your feet are positioned correctly on the pedals. A proper cleat alignment helps in achieving efficient power transfer and minimizes the risk of foot or knee injuries.
Resistance settings should be tailored to your individual strength and fitness levels. Beginners might start with lower resistance to focus on form, while more advanced riders may increase resistance to enhance their workout intensity and cardiovascular benefits.
What Common Mistakes Should Be Avoided When Positioning on a Spin Bike?
When positioning on a spin bike, it’s essential to avoid several common mistakes to ensure proper form and maximize efficiency.
- Incorrect saddle height: Setting the saddle too high or too low can lead to discomfort and injury. A proper saddle height allows for a slight bend in the knee at the bottom of the pedal stroke, which enhances power and reduces strain.
- Poor handlebar height: Having handlebars positioned too high or too low can affect your riding posture. Ideally, the handlebars should be at a height that allows for a flat back and relaxed shoulders, promoting better breathing and overall comfort.
- Overreaching for the handlebars: Positioning yourself too far forward can cause strain on the back and shoulders. Your elbows should be slightly bent, and your hands should rest comfortably on the handlebars without excessive stretching.
- Neglecting core engagement: Failing to engage your core while riding can lead to poor stability and increased fatigue. A strong core supports your upper body and helps maintain a proper riding position over longer durations.
- Improper foot positioning: Placing your feet incorrectly in the pedal clips can lead to discomfort and decreased efficiency. Your feet should be positioned so that the ball of your foot is directly over the pedal axle, allowing for optimal power transfer.
- Ignoring alignment: Misalignment of the knees and hips during pedaling can cause knee pain and affect performance. Ensure that your knees track straight and do not bow in or out while cycling, which can be achieved by adjusting the saddle and pedal positions.
- Riding with a rigid upper body: Holding tension in the upper body can hinder your performance and increase fatigue. Maintaining a relaxed upper body allows for better breathing and energy efficiency, facilitating a smoother ride.